So we have setup our source control (GitHub) for team collaboration (Part 1) , next we should consider the Terraform state file.
By Default Terraform will create a local state file (terraform.tfstate), this does not work when collaborating as each person needs to have the latest version of the state data prior to performing any Terraform actions. In addition you need to ensure that nobody else is running Terraform at the same time. Having a remote state helps mitigate these issues.
There are a number of different locations that Terraform supports for storing remote state, we will look at using Azure Blob Storage in this demonstration (I used terraform cloud in this article if you are interested). This natively allows state locking and consistency checking. In addition we will use a SAS token to provide authentication to collaborators.
Root module
We are going to setup this environment with re-usable repeatable code in mind. The working directory when we start defining our resources, variables and outputs is referred to as the root module. Through this demo we will be using modules from the terraform registry and we will make some of our own. Lets start with the root module;

**Modules are a wrapper around a collection of Terraform resources. Using modules allows you to break your code into smaller blocks which can make reading code easier and aid in troubleshooting. In addition a module allows for easier reuse of code blocks.**
**All modules tend to have the same construct, a main.tf , output.tf and the variables.tf. Terraform will process any file with a .tf extension and it does all the heavy lifting working out the run order, dependencies etc. You could call the files whatever you want but lets standardise.**
main.tf
First off we need to define our provider, we will be using the azurerm provider;
|
|
Pretty simple. The features part need not have any values but the provider does not work without it declared. I will need to run ‘a_z login_’ in my console to authenticate with my Azure subscription once I start creating resources but for now that is all we need.
At this point we could start defining all of our Azure resource blocks but lets drop it all into a module;
module : azure_remote_state
As mentioned above, code re-use is key so we could take a look at the terraform registry and see if there is already a module we could use for our azure remote state. Well there is but I am not using it for two reasons. Firstly it does not give me everything I want and secondly it is a good excuse to create our own module and learn something. We will be consuming existing modules from the registry later on in the demo.
Any module we create needs to be located in a modules/module_name folder in our root module location. The module folder can be called anything you like. For our example we will use “remote_state”. Under this folder we create the standard constructs (main.tf, variables.tf and output.tf)

We will start off in the module main.tf and construct the Azure components we need for our remote state. But first, lets define a terraform configuration in our module. At a minimum we should be specifying the required version based on what we used to develop this example.
|
|
Now we can move onto our remote state configuration. The remote state will need;
Azure resource group > Azure storage account > container in the storage account
Lets start with the resource group. The section headings will reflect the names defined in the azurerm provider.
azurerm_resource_group
We need to define a name for the resource group a location and perhaps some tags at a minimum. The values for these should be variables and can be changed on the module calling block in the root main.tf
|
|

**merge Function : We have used the merge function in the tags block. This function will return a single map or object from all arguments. More details here.**
Seeing as we already require variables defined, we will add them to the modules variables.tf as we go.
|
|
Now we have a resource group to host our resource we can define the storage account.
azurerm_storage_account
One of the criteria for a Azure storage account is that the name is unique within Azure. No two storage accounts can have the same name. Fortunately Terraform has a random provider, we will use the random_integer resource from this provider to help us generate a random name for our storage account.
|
|
Lets add the variables;
|
|
azurerm_storage_container
The container is used to organise your blobs. Think of it as a directory structure in a file system. There are no limits to the number of containers or the number of blobs a container can store.
|
|
and the variables
|
|
azurerm_storage_account_sas
When sharing the remote state we want some degree of access management and not have something publicly accessible. Once we have created the storage account we can obtain a Shared Access Signature (SAS Token) which allows fine-grained, ephemeral access control to various aspects of the storage account. This is defined as a data source type and not a resource type as we have been using previously. There are a lot of setting here so I will link to the official docs which you can read at your own leisure.
|
|
All of the settings could be created as variables but for our use case it’s not required. Lets add the two we do need which will define the length of time the sas token is valid (before it expired). We can control these from the root module when calling this module.
|
|
null_resource / local-exec provisioner
When we change from local to remote state we will add a backend configuration to our root module and perform a terraform init feeding in the variables required for the new backend. What we will do now is create an output file containing this information in the required format. We can feed this in as the -backend-config parameter when we run the terraform init
The required variables are;
- storage_account_name
- container_name
- key (we will use the Terraform default terraform.tfstate)
- sas_token
It goes without saying this information needs to be securely stored and securely shared.
To generate this output we are going to utilise the Terraform null_resource and local-exec provisioner.

The local-exec provisioner invokes a local executable after a resource is created.
|
|
Just the one variable for this one which is the output file
|
|
That finishes off the module configuration. The only output we need is being handled by our null_resource so we don’t really need the output.tf but I may use it so will leave it there for now.
Next we look at calling the module and providing all those values we defined as variables.
Back to the root module main.tf
root - module
so far our root module is looking a bit light. We have only added the Azure provider. Lets now add a module block so we can utilise the remote state module we just created.
|
|
That should be enough for us to provision our remote state infrastructure. All goes well we will have an input file we can use when we change the state to remote. Lets see if it works!
Terraform init
We will first initialise our Terraform configuration so Terraform can prepare our working directory for its use.

No issues with the ‘terraform init’ so lets try ‘terraform plan’ next including a plan file.

This is just to show you what happens if you forget to login to azure first, its pretty descriptive :)
Now that I have logged into Azure…..
The plan..

Plan is looking good.

Lets proceed with the ‘terraform apply’ using the plan file and then take a look at our Azure Resource groups

Terraform output for the apply phase

terraform apply demo.tfplan
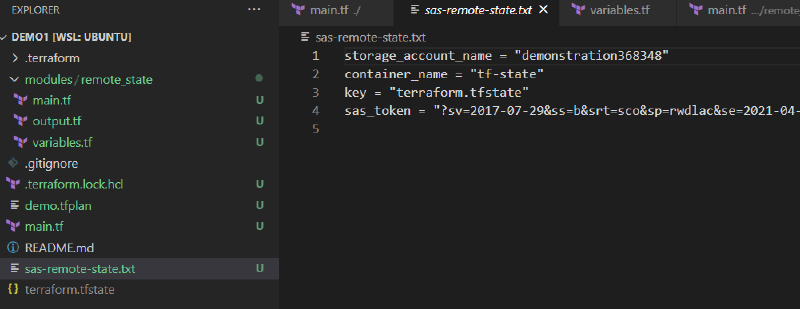
Lets see if the backend configuration file with the SAS Token details was generated;

sas-remote-state.txt generated using null_resource and local-exec
Everything is looking good. Our Azure infrastructure is deployed ready to hold our terraform state. We can now enable remote state!
Enable remote state
There are two parts to this process, first we need to update the root module to use a terraform configuration block (same as we did for the version dependency in our module) and then run terraform init with some backend parameters. Lets first update the root module main.tf
All we need to define in the root module is the following;
|
|
This is instructing terraform to use the azurerm provider to connect to the backend, All it needs now are the backend configuration information which we provide from our sas-remote-state.txt file when we initialise the remote state.

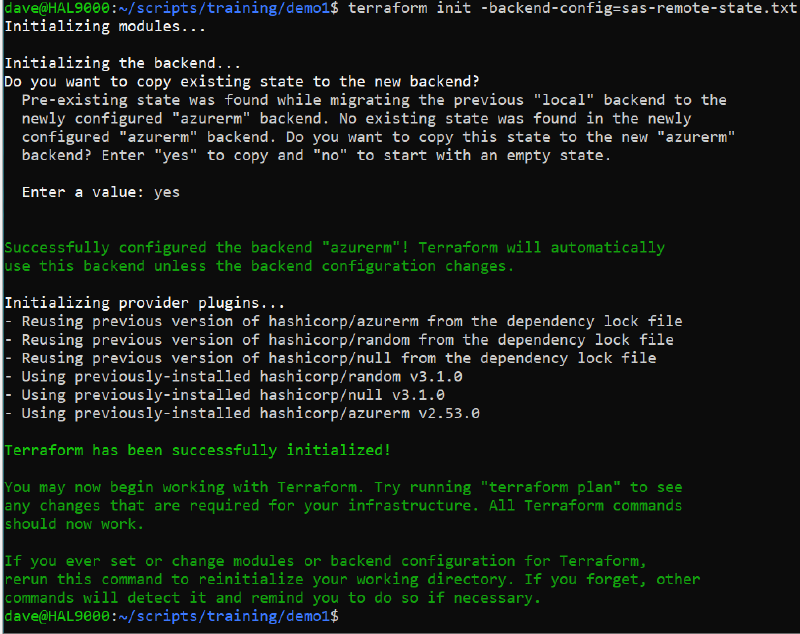
terraform init using the previously generates backend configuration file
You can see that terraform has located the remote backend and seen there is no state there presently. We will answer yes to copy the local state to the remote backend.

terraform init using the previously generates backend configuration file
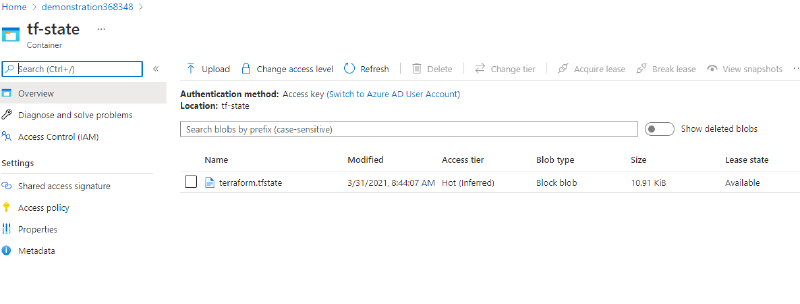
it we check the Azure storage account container we should see our state file;

Azure portal showing the terraform.tfstate (remote state)

Source control
Throughout the process we should be committing our changes to our VCS and making any changes to the README.md or .gitignore file.
Following on from this exercise I have added an exclusion to my .gitignore file to ensure the storage account configuration is not in the public space.
|
|
It is a good idea to then clear the git cache when making changes to tracked or untracked files in the .gitignore file. The following command sequence was used to clear the cache and update all our changes.
|
|
Summary
That ends this part of the demonstration. We have successfully defined our Azure configuration for hosting our Terraform state file and copied our state over by initialising the terraform configuration. If you want to move back to a local state for testing you can change the ‘azurerm’ part of the backend configuration to ‘local’. Once you run terraform init again (without the backend configuration file) you will be asked to copy the file locally.
In part 3 we will start deploying the AWS infrastructure components.
Disclaimer: You may incur costs if you follow along with the exercise. Use at your own risk!