Our demo WordPress site (part 1 & part 2) is now hosting publicly available content (This page for example). You have written a number of posts, have a few in draft and finally found a theme you liked. What next? Lets discuss backup, swapfile, snapshots, monitoring and certificates.

Backup

Last thing you want is to have thrown your heart and sole into a number of posts only for the EC2 instance to crash and you lose all that work. There are many ways to ensure you have backups of your EC2 instance and/or data. I have put two options below which your could choose one or the other or like me, use both.

WP Backup

If you dig around the multitude of plugins available for WordPress you should be able to spot a few relating to backup. They all have differing capabilities and options. I was looking for something that could backup the website and SQL and then dump these off server somewhere. Cost was also a factor.

I came across BackWPup which allowed me to do these very things and I only needed to spend any money if I wanted push button recovery. I have no SLA, RTO or RPO so thought I would try the free version first. Works great, backups are being dumped to an S3 bucket and I have attempted a test restore of mysql on a test database which was pretty painless.

Snapshot

As well as using the WordPress plugin I decided to keep snapshots in AWS. The rate of change on the instance will be minor so figured the snapshot will allow a pretty painless recovery. Worst case I compliment the snapshot with either the SQL or file backups from the plugin. AWS provide a snapshot lifecycle management capability which I will be using.

The majority of activities performed in the article can be performed using the AWS Console. I was once given a great suggestion to try and do everything from the command line interface (CLI). I have found you learn more this way so where possible this is the method I will use.

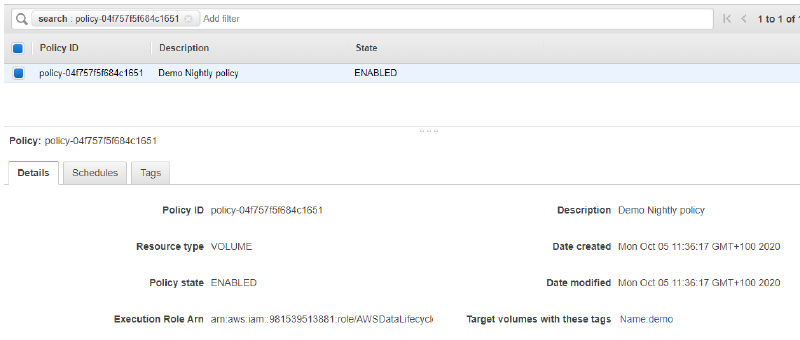
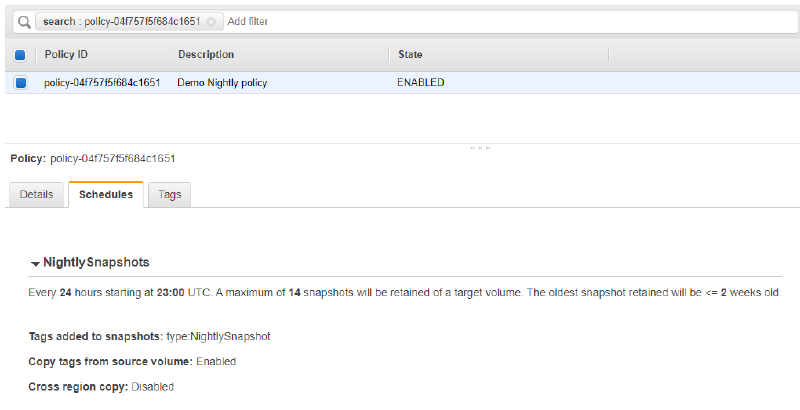
Within Lifecycle Management my preference was to define a snapshot every 24 hrs from 23:00. I will be retaining 14 days worth of snapshots.

You can use a json input file for your lifecycle policy, this is the one I used.

 1
 2
 3
 4
 5
 6
 7
 8
 9
10
11
12
13
14
15
16
17
18
19
20
21
22
23
24
25
26
27
28
{
	"ResourceTypes": [
		"VOLUME"
	],
	"TargetTags": [{
		"Key": "Name",
		"Value": "demo"
	}],
	"Schedules": [{
			"Name": "NightlySnapshots",
			"TagsToAdd": [{
				"Key": "type",
				"Value": "NightlySnapshot"
			}],
			"CreateRule": {
				"Interval": 24,
				"IntervalUnit": "HOURS",
				"Times": [
					"23:00"
				]
			},
			"RetainRule": {
				"Count": 14
			},
			"CopyTags": true
		}
	]
}

The default role “AWSDataLifecycleManagerServiceRole” will be created for AWS to manage the snapshots for you. If you have more restrictive requirements you can create your own role. Note that the person executing this CLI will also need dlm permissions.

So lets run the dlm command to create the policy reading in the json file

1
2
3
4
5
6
7
8
PS C:\\Users> aws dlm create-lifecycle-policy /
--description "Demo Nightly policy" --state ENABLED /
--execution-role-arn arn:aws:iam::SuperSecretAccountNumber:role/AWSDataLifecycleManagerDefaultRole /
--policy-details file://demo_policy.json                                                                                                                                  {
    "PolicyId": "policy-04f757f5f684c1651"
}

PS C:\\Users>

We know we have been successful as we have been provided with a PolicyId. Lets take a quick look in the console to check.
Sizing

The terraform deployment was configured to use a t2-micro EC2 instance type. This only gives us 1vCPU, 1GB memory and an 8GB root volume. This is pretty small but I thought I would see how it goes.

So far the only concern was the volume size so I pushed this up to 100GB

First you need to expand the volume in the console or using the Command Line Interface (CLI).

Breakdown of the steps below;

  1. Retrieve the volume id and size using the instance Name tag (demo in this case)
  2. Expand the volume using the volume id you just retrieved
  3. Check its worked
 1
 2
 3
 4
 5
 6
 7
 8
 9
10
11
12
13
14
15
16
17
18
19
20
21
22
23
24
25
26
27
28
29
30
31
32
33
PS C:\\Users> aws ec2 describe-volumes /
 --filters Name=tag:Name,Values=demo --query "Volumes[*].{VolumeID:VolumeId,Size:Size}"                                                        \[
    {
        "VolumeID": "vol-0875ae353889ac1a3",
        "Size": 8
    }
 ]

PS C:\\Users> aws ec2 modify-volume --size 100 --volume-id vol-0875ae353889ac1a3                                                                                                     {
    "VolumeModification": {
        "VolumeId": "vol-0875ae353889ac1a3",
        "ModificationState": "modifying",
        "TargetSize": 100,
        "TargetIops": 300,
        "TargetVolumeType": "gp2",
        "OriginalSize": 8,
        "OriginalIops": 100,
        "OriginalVolumeType": "gp2",
        "Progress": 0,
        "StartTime": "2020-10-05T08:57:52+00:00"
    }
}

PS C:\\Users> aws ec2 describe-volumes /
--filters Name=tag:Name,Values=demo /
--query "Volumes[*].{VolumeID:VolumeId,Size:Size}"                                                        \[
    {
        "VolumeID": "vol-0875ae353889ac1a3",
        "Size": 100
    }
]

PS C:\\Users>   

Now that we have resized the volume, we should extend the file system for the OS to use it.

First let’s putty onto the EC2 instance and check the disk setup

 1
 2
 3
 4
 5
 6
 7
 8
 9
10
11
12
13
14
[ec2-user@ip-10-0-1-9 ~]$ df -hT
Filesystem     Type      Size  Used Avail Use% Mounted on
devtmpfs       devtmpfs  474M     0  474M   0% /dev
tmpfs          tmpfs     492M     0  492M   0% /dev/shm
tmpfs          tmpfs     492M  456K  492M   1% /run
tmpfs          tmpfs     492M     0  492M   0% /sys/fs/cgroup
/dev/xvda1     xfs       8.0G  1.4G  6.7G  17% /
tmpfs          tmpfs      99M     0   99M   0% /run/user/0
tmpfs          tmpfs      99M     0   99M   0% /run/user/1000
[ec2-user@ip-10-0-1-9 ~]$ lsblk
NAME    MAJ:MIN RM  SIZE RO TYPE MOUNTPOINT
xvda    202:0    0  100G  0 disk
└─xvda1 202:1    0    8G  0 part /

This is telling us which file systems are in use for each volume. We only have the one volume so the important line for us /dev/xvda1. We then check the block information using lsblk. This is telling us the root volume /dev/xvda has one partition /dev/xvda1. The root is showing as 100G and the partition as 8GB.

1
2
3
4
5
6
7
8
[ec2-user@ip-10-0-1-9 ~]$ sudo growpart /dev/xvda 1
CHANGED: partition=1 start=4096 old: size=16773087 end=16777183 new: size=209711071 end=209715167
[ec2-user@ip-10-0-1-9 ~]$ lsblk
NAME    MAJ:MIN RM  SIZE RO TYPE MOUNTPOINT
xvda    202:0    0  100G  0 disk
└─xvda1 202:1    0  100G  0 part /
[ec2-user@ip-10-0-1-9 ~]$

Pretty simple, we ran a growpart against the volume telling it to grow partition 1. A quick check using lsblk confirms the extension has been successful.

Certificate renewals

Having never used certbot before I was wondering how I would setup auto-renewals. I had a dig around and could see no cron jobs defined. It appeared that for some distro it would add a line to crontab, looks like we need to do this manually.

This is what the crontab (sudo crontab -e) task looks like

1
2
59 1,13 \* \* \* root certbot-auto renew --no-self-upgrade

What does all that mean?

  • 59 1,13 * * * : Run the command at 1:59 and 13:59 every day. Twice a day is a recommendation from the certbot developer
  • root : Run the command as the root user
  • certbot-auto renew : Certbot will check and update any certificates that are approaching expiration
  • --no-self-upgrade : Stops certbot from upgrading itself.

Save the crontab and then restart the crond service

1
2
3
4
5
6
7
8
[root@ip-10-0-1-4 etc]# crontab -e
no crontab for root - using an empty one
crontab: installing new crontab
[root@ip-10-0-1-4 etc]# service crond restart
Stopping crond:                                            [  OK  ]
Starting crond:                                            [  OK  ]
[root@ip-10-0-1-4 etc]# 

You can perform a dry run to ensure the command is correct.

 1
 2
 3
 4
 5
 6
 7
 8
 9
10
11
12
13
14
15
16
17
18
19
20
21
22
23
24
25
26
27
28
29
30
31
32
33
34
35
36
37
38
39
40
41
42
[root@ip-10-0-1-4]# ./certbot-auto renew --no-self-upgrade --dry-run
Saving debug log to /var/log/letsencrypt/letsencrypt.log

- - - - - - - - - - - - - - - - - - - - - - - - - - - - - - - - - - - - - - - -
Processing /etc/letsencrypt/renewal/davehart.co.uk.conf
- - - - - - - - - - - - - - - - - - - - - - - - - - - - - - - - - - - - - - - -
Cert not due for renewal, but simulating renewal for dry run
Plugins selected: Authenticator apache, Installer apache
Running pre-hook command: httpd -k stop
Renewing an existing certificate
Performing the following challenges:
http-01 challenge for davehart.co.uk
Waiting for verification...
Cleaning up challenges

- - - - - - - - - - - - - - - - - - - - - - - - - - - - - - - - - - - - - - - -
new certificate deployed with reload of apache server; fullchain is
/etc/letsencrypt/live/davehart.co.uk/fullchain.pem
- - - - - - - - - - - - - - - - - - - - - - - - - - - - - - - - - - - - - - - -

- - - - - - - - - - - - - - - - - - - - - - - - - - - - - - - - - - - - - - - -
** DRY RUN: simulating 'certbot renew' close to cert expiry
**          (The test certificates below have not been saved.)

Congratulations, all renewals succeeded. The following certs have been renewed:
  /etc/letsencrypt/live/davehart.co.uk/fullchain.pem (success)
** DRY RUN: simulating 'certbot renew' close to cert expiry
**          (The test certificates above have not been saved.)
- - - - - - - - - - - - - - - - - - - - - - - - - - - - - - - - - - - - - - - -
Running post-hook command: httpd -k start
Output from post-hook command httpd:
httpd (pid 23491) already running


IMPORTANT NOTES:
 - Your account credentials have been saved in your Certbot
   configuration directory at /etc/letsencrypt. You should make a
   secure backup of this folder now. This configuration directory will
   also contain certificates and private keys obtained by Certbot so
   making regular backups of this folder is ideal.
[root@ip-10-0-1-4]#

This all looks promising but I will still have a calendar reminder set closer to the expiration time :)

AWS Route 53 Healthcheck

As I am using Route 53 to handle my external DNS needs it would be a good idea to utilise the health check capability provided with the service. This can check to ensure a page responds to queries from multiple geographically disperse locations. If a failure threshold is reached it can be configured to notify you via AWS Simple Notification Service (SNS).

Lets first setup the SNS Topic and subscription. For the topic we are retrieving only the TopicArn so we can feed this into the subscription. My configuration is pretty straight forward but lets again make it more interesting and configure it from the CLI.

1
2
3
4
#create the sns topic
$topic = aws sns create-topic --name "your topic name" --query 'TopicArn' --region us-east-1
#create the subscription to the sns topic
aws sns subscribe --topic-arn $topic --protocol email --notification-endpoint enteremailaddresshere --region us-east-1

AWS Route 53 health check service is only available in us-east-1. So if you are alerting on Route53 metrics look for them in us-east-1 and any SNS topics for these alerts will need to be in the same region

First off lets setup our json input file we will use when creating the health check (create-health-check.json). Note that the regions relate to the geographic locations AWS will use to test your FQDN. You need a minimum of three.

 1
 2
 3
 4
 5
 6
 7
 8
 9
10
11
{
	"FullyQualifiedDomainName": "davehart.co.uk",
	"Port": 443,
	"Type": "HTTPS",
	"RequestInterval": 30,
	"FailureThreshold": 3,
	"EnableSNI": true,
	"Regions": ["us-west-1", "eu-west-1", "us-east-1"]
}


Next we create the health check using the create-health-check subcommand

1
2
PS C:\Users> aws route53 create-health-check /
--caller-reference demo-1 --health-check-config file://create-health-check.json

Even with defining a json input file it appears you have to name/tag the health check afterwards! Tags are key. Tag everything!

1
2
3
4
aws route53 change-tags-for-resource /
--resource-type healthcheck /
--resource-id 41633bb1-4adc-4357-983f-767191ff3248 /
--add-tags Key=Name,Value="demo"

I could not find a way to generate the alarm during the creation of the health check so used the following command feeding in the value from the HealthCheckId key value pair generated by the create-health-check command above.

 1
 2
 3
 4
 5
 6
 7
 8
 9
10
11
12
13
aws cloudwatch put-metric-alarm /
--alarm-name "demo-monitor" /
--alarm-description "Alarm when website is not responding" /
--metric-name HealthCheckStatus /
--namespace AWS/Route53 /
--statistic Minimum /
--period 60 /
--comparison-operator LessThanThreshold  /
--dimensions "Name=HealthCheckId,Value=%HealthCheckId%" /
--evaluation-periods 3 /
--alarm-actions %arnforsnstopic% /
--threshold 1 /
--region us-east-1

We can pop all that into a single script

 1
 2
 3
 4
 5
 6
 7
 8
 9
10
11
12
13
14
15
$caller_ref = "wp-demo"
$topic_name = "wp-demo-topic"
$email_add = "secretemailaddress"
$json_loc = "c:\users\create-health-check.json"
$health_check_name = "wp demo health check"
$alarm_name = "wp demo alarm monitor"
$alarm_description = "wp Alarm when website is not responding"
#create Topic
$topic = aws sns create-topic --name $topic_name --query 'TopicArn' --region us-east-1
#create subscription
aws sns subscribe --topic-arn $topic --protocol email --notification-endpoint $email_add --region us-east-1
#Create the health check retrieving the id
$healthyid = aws route53 create-health-check --caller-reference $caller_ref --health-check-config file://$json_loc --query 'HealthCheck.Id'
aws route53 change-tags-for-resource --resource-type healthcheck --resource-id $healthyid --add-tags Key=Name,Value=$health_check_name
aws cloudwatch put-metric-alarm --alarm-name $alarm_name --alarm-description $alarm_description --metric-name HealthCheckStatus --namespace AWS/Route53 --statistic Minimum --period 60 --comparison-operator LessThanThreshold  --dimensions "Name=HealthCheckId,Value=$healthyid" --evaluation-periods 3 --alarm-actions $topic --threshold 1 --region us-east-1

You will have to confirm the subscription email manually.

Swapfile

Once I had the above health check enables I started to receive health status alerts at certain times. Investigation showed that the mysql process was not running. Checking over the logs I discovered

Out of memory: Kill process 3923 (mysqld). Oh dear!

If you recall, this is a very small EC2 instance (t2.micro) with only 1GB RAM. The first thing I though of was to check for a swap file

A swap file (also known as virtual memory) contains temporary paged contents of RAM. This allows RAM to be used by other processes. In this instance we will be using the EBS volumes to host the swap file.

Using the command “free -m” it was evident there was no swap file. Figured this would be the first step in troubleshooting this issue without throwing more RAM at the EC2 instance.

The recommendation from AWS

As a general rule, calculate swap space according to the following:

Amount of physical RAM Recommended swap space
2 GB of RAM or less 2x the amount of RAM but never less than 32 MB
More than 2 GB of RAM but less than 32 GB 4 GB + (RAM – 2 GB)
32 GB of RAM or more 1x the amount of RAM

We fell into the first category. The steps for creating the swap file on an Amazon Linux EC2 instance are listed below

 1
 2
 3
 4
 5
 6
 7
 8
 9
10
11
# dd command creates the swap file
# bs = block size and count = number of blocks
sudo dd if=/dev/zero of=/swapfile bs=64M count=32
# ensure the permissions are correct for the swap file you just created
sudo chmod 600 /swapfile
#tell linux where the swap file is you created
sudo mkswap /swapfile
#tell linux to use the swap file is you created
sudo swapon /swapfile
#check it is working
sudo swapon -s

Once the above steps are complete you need to update the fstab to ensure the swap file is enabled at boot

1
2
#edit the fstab
sudo vi /etc/fstab

Add the following line to the bottom of the fstab

1
/swapfile swap swap defaults 0 0

Conclusion

So far so good. Server has been up for a good few weeks with no issues. I will update this page if any further updates are required.

Thanks for hanging in there.